
Taking a screenshot on a Windows computer is one of those simple tasks that becomes surprisingly useful once you know the right shortcut. Whether you want to save an important part of a website, capture an error message, show someone what is happening on your screen, save an image from a presentation, or create a tutorial, Windows gives you several built-in ways to do it. You do not necessarily need a third-party screenshot application because Windows 10 and Windows 11 already include tools and keyboard shortcuts for capturing your screen.
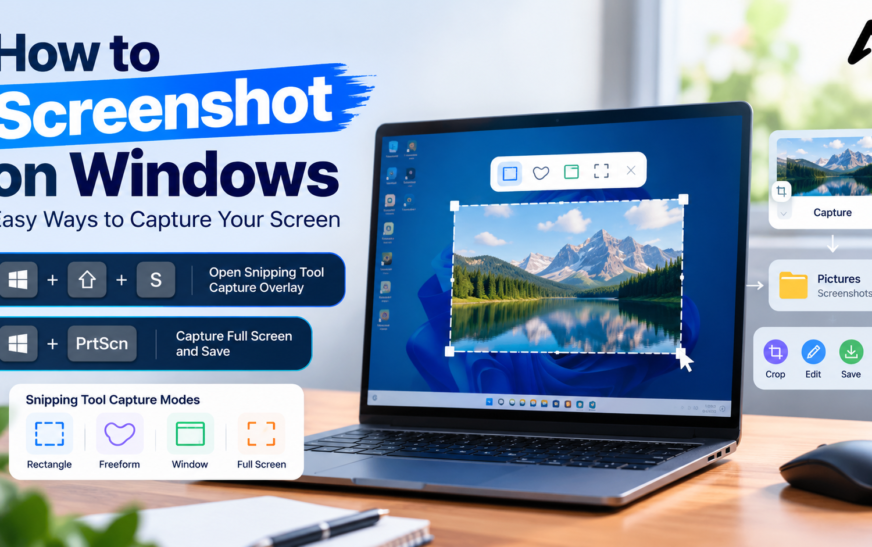
The fastest method for most people is Windows + Shift + S. This shortcut opens the Snipping Tool capture interface and lets you select a rectangular area, freeform area, individual window, or the entire screen. If you want an automatic full-screen image file, Windows + PrtScn is another convenient option. You can also use PrtScn to copy a screen capture to the clipboard or Alt + PrtScn to capture only the active window.
The good news is that learning these methods takes only a few minutes. Once you understand the difference between copying a screenshot to the clipboard and saving one as a file, you can choose the right method almost instantly. This guide explains how to screenshot on Windows, how to screenshot on a laptop, where screenshots are saved, how to capture only part of the screen, how to use Snipping Tool, and what to do when the Print Screen key does not seem to work.
How to Screenshot on Windows Quickly
If you need a quick answer, press Windows + Shift + S. Your screen will dim and the Windows screenshot controls will appear. You can then choose the area you want to capture and drag your mouse around it.
After the capture, Windows copies the screenshot to the clipboard and provides access to the Snipping Tool editor. From there, you can edit, annotate, copy, save, or share the screenshot.
For a full-screen screenshot that is automatically saved, press Windows + PrtScn. Windows saves the captured image in the Pictures > Screenshots folder.
Here are the most useful methods at a glance:
| What you want to do | Shortcut or method | Best use |
| Capture part of the screen | Windows + Shift + S | Selecting a specific area |
| Capture the entire screen and save it | Windows + PrtScn | Creating a permanent image |
| Capture the entire screen to clipboard | PrtScn | Quickly pasting an image |
| Capture the active window | Alt + PrtScn | Capturing one application |
| Open screenshot controls | Snipping Tool | Editing and advanced captures |
| Capture a delayed screenshot | Snipping Tool Delay | Menus and temporary elements |
| Record part of the screen | Windows + Shift + R | Screen video clips |
How to Screenshot on Windows With Windows + Shift + S
The Windows + Shift + S shortcut is probably the most useful screenshot keyboard shortcut for everyday Windows users. It works with the built-in Snipping Tool and gives you control over exactly what appears in the screenshot.
First, open the page, application, document, or other content that you want to capture. Make sure everything you need is visible. Then press Windows + Shift + S at the same time.
The screen will become slightly darker and a capture toolbar will appear. Depending on your Windows version, you can choose from different capture modes.
The main options include:
- Rectangle: Select a rectangular area by dragging your mouse.
- Freeform: Draw around an irregular area.
- Window: Select a particular application window.
- Full screen: Capture the entire display.
If you choose the rectangle option, click and drag around the content you want. When you release the mouse button, Windows captures the selected area.
The screenshot is then copied to your clipboard, and you can open the Snipping Tool notification to edit or save it. Microsoft currently recommends Windows + Shift + S as a direct way to open the screen-snipping overlay.
Why Windows + Shift + S Is So Useful
The biggest advantage of this shortcut is precision. Instead of taking a screenshot of your entire desktop and cropping it later, you can select exactly what you need at the moment of capture.
For example, imagine that you are trying to show someone a particular error on a website. You do not need to include your browser tabs, taskbar, desktop wallpaper, or unrelated applications. Simply select the error message and capture it.
This makes Windows + Shift + S particularly useful for students, office workers, technical support requests, bloggers, teachers, developers, and anyone who regularly needs to explain something visually.
How to Screenshot on Windows Using Keyboard Shortcuts
If you want to know how to take a screenshot on Windows, keyboard shortcuts are the fastest option.
Press Windows + Shift + S to open the Snipping Tool capture interface. Your screen will dim, allowing you to select a rectangular area, free form area, window, or full screen. This is especially useful when you want to know how to screenshot part of the screen on Windows.
For a full-screen image, press Windows + PrtScn. Windows saves the screenshot automatically in Pictures > Screenshots.
You can also press Print Screen (PrtScn) to copy the visible screen to your clipboard. Open Paint, Word, or another compatible application and press Ctrl + V to paste it. On some laptops, you may need to press Fn + PrtScn.
How to Screenshot on Windows 11 and Windows 10
Windows 11 supports Windows + Shift + S, Windows + PrtScn, Print Screen, and the Snipping Tool. The Snipping Tool is particularly useful when you want to capture and edit a specific area.
Windows 10 also supports these common screenshot methods. However, Microsoft ended support for Windows 10 on October 14, 2025, so users should consider upgrading to a supported Windows version when possible.
How to Take a Screenshot on a Windows Laptop
Learning how to take a screenshot on a Windows laptop is simple. If your laptop has a Print Screen key, you can use it with the appropriate shortcut. If the key is combined with another function, try using the Fn key.
Alternatively, Windows + Shift + S works as a convenient option for capturing a selected area without relying on the Print Screen key.
How to Use the Snipping Tool
The Snipping Tool provides more control than a basic screenshot shortcut. You can capture a selected area, window, or full screen, then make basic edits, annotations, or save the image.
For a long webpage, a normal screenshot captures only the visible area. A browser or application may provide its own scrolling or full-page screenshot feature.
How to Take a Full-Screen Screenshot on Windows
Sometimes you want to capture everything currently visible on your monitor. In that situation, a full-screen screenshot is more convenient than manually selecting an area.
The easiest shortcut for automatically saving a full-screen screenshot is:
Windows + PrtScn
Press both keys together. Windows captures the complete display and saves the image as a file.
You can normally find the screenshot by opening File Explorer > Pictures > Screenshots. Microsoft specifically documents this location for screenshots created with the Windows logo key plus Print Screen shortcut.
This method is useful when you want to keep a permanent copy of what was displayed. For example, you might want to document a software error, preserve an online confirmation page, save a particular configuration, or create evidence for a troubleshooting conversation.
One thing to remember is that a full-screen screenshot captures everything visible on the display. Before sharing it, check whether it contains personal information, private conversations, email addresses, account details, or other information you did not intend to send.
How to Screenshot an Active Window on Windows
If you have several windows open but only want to capture one of them, use Alt + PrtScn.
Start by clicking the application window you want to capture. This makes it the active window. Then press Alt + PrtScn.
Windows can copy an image of the active window to the clipboard, making it easy to take a screenshot on computer without capturing the entire screen. You can then open Paint, Word, an email application, a messaging app, or another compatible program and press Ctrl + V to paste the screenshot. If you need to adjust your screen view before capturing it, you can also learn How to Zoom Out on Computer for a better overall view. Microsoft documents this shortcut as a convenient way to copy only the active window.
This technique is particularly useful for tutorials and technical support. Suppose you are explaining how to use a particular application. Instead of capturing your entire desktop, you can capture only that application’s window.
It also keeps your screenshots cleaner. Readers can immediately see what matters instead of having to search through unrelated desktop content.
How to Use the Snipping Tool on Windows
The Snipping Tool is Microsoft’s built-in screenshot application for Windows 10 and Windows 11. It is more than a basic screen-capture utility because it combines capturing, editing, annotation, saving, sharing, and other useful functions in one application.
To open it, select the Start menu and search for Snipping Tool. You can also press Windows + Shift + S to quickly open the screenshot overlay. Microsoft currently lists rectangle, window, full-screen, and freeform capture modes.
After taking a screenshot, you can make changes before saving it. For example, you can crop unnecessary areas, draw around an important section, highlight information, or add annotations.
This makes Snipping Tool a particularly good choice when the screenshot is going to be used in a guide or shared with another person.
Rectangle Snip
The rectangle mode is one of the most practical options. You simply drag a rectangular selection around the content you want to capture.
It works well for websites, documents, application interfaces, error messages, charts, images, and individual sections of a screen.
If you want clean-looking screenshots for a blog article, tutorial, presentation, or documentation, this is often the best mode to start with.
Window Snip
The window option lets you select a particular application or window.
This is useful when you have several applications open and want to capture only one. Instead of carefully dragging around the window’s edges, you can select the window directly.
Full-Screen Snip
Full-screen mode captures the entire display.
It is useful when the entire screen is relevant or when you need a quick record of everything visible at a particular moment.
Freeform Snip
Freeform mode allows you to draw a custom shape around the content you want.
This can be useful when a rectangular selection would include too much unnecessary background. It gives you more flexibility when the object or area you want to capture does not fit naturally inside a rectangle.
How to Screenshot on Windows Using the Print Screen Key
The Print Screen, commonly abbreviated as PrtScn, PrtSc, or PrntScrn, is another traditional Windows screenshot method.
When you press PrtScn, Windows can capture the screen and place the image in the clipboard. You can then paste it into another application using Ctrl + V. Microsoft’s current Windows shortcut documentation also notes that the Print Screen behavior can be configured through Windows settings.
This explains why some people press Print Screen and think that nothing happened. Unlike Windows + PrtScn, the screenshot may not immediately appear as a new file in a folder. Instead, it may be waiting in the clipboard.
Open Paint and press Ctrl + V to see whether the screenshot was copied successfully. You can then edit it and save it as an image.
How to Screenshot on a Laptop Without a Print Screen Key
Laptop keyboards can be confusing because some models do not have a dedicated Print Screen button. Others combine Print Screen with another function.
If your laptop does not have a visible PrtScn key, you can often use the Snipping Tool instead. Press Windows + Shift + S and select the area you want to capture.
Microsoft also documents Fn + Windows + Space Bar as an alternative on devices that do not have a PrtScn button. Hardware layouts vary, so the exact method can depend on your laptop.
If you regularly take screenshots, using Windows + Shift + S can be easier than remembering a manufacturer-specific Fn combination.
How to Screenshot on Windows 10
Windows 10 includes several of the same screenshot methods available in Windows 11.
For a selected area, use:
Windows + Shift + S
For a full-screen screenshot saved to a file, use:
Windows + PrtScn
For the active window, use:
Alt + PrtScn
Windows 10 also includes Snipping Tool, allowing users to capture different portions of the display. Microsoft’s current Snipping Tool documentation applies to both Windows 10 and Windows 11.
The exact appearance of the tools may differ depending on your Windows version and updates, but the core screenshot workflow remains familiar.
How to Screenshot on Windows 11
Windows 11 makes the Snipping Tool an especially convenient part of the screenshot workflow.
Press Windows + Shift + S to open the capture overlay. Select the capture mode and take your screenshot.
Windows 11’s current Snipping Tool also includes additional features beyond basic screenshots. Microsoft documents tools for annotation, cropping, text extraction, and, on supported Copilot+ PCs, AI-powered features such as Perfect Screenshot and Color picker.
The Perfect Screenshot feature is designed for supported Copilot+ PCs and can automatically adjust a capture area to better frame visible content. The Color picker can capture exact color values from the screen.
These newer features are not necessary for ordinary screenshot tasks, but they show how the built-in Windows screenshot experience has developed beyond simply pressing Print Screen.
How to Edit a Screenshot on Windows
Taking a screenshot is often only the first step. You may need to crop the image, highlight an important button, circle an error, or remove unnecessary information before sharing it.
After capturing an image through Snipping Tool, you can use its editing tools to annotate the screenshot. Microsoft currently documents options including pen, highlighter, shapes, eraser, cropping, undo, redo, and text actions.
The text actions feature is particularly useful when you want to extract words from an image. Instead of manually typing information from a screenshot, supported versions of Snipping Tool can help identify and copy text from the captured image.
For more advanced image editing, you can also open the screenshot in Paint.
How to Save a Screenshot on Windows
If you use Windows + PrtScn, Windows automatically saves the screenshot as an image file.
Look under:
Pictures > Screenshots
If you use Windows + Shift + S, the screenshot is copied to the clipboard and can be opened in Snipping Tool. From there, select the save option and choose where you want the image stored. Microsoft documents Ctrl + S as a Snipping Tool save shortcut.
When saving screenshots manually, use descriptive filenames rather than leaving every image with a generic name.
For example:
windows-screenshot-guide.png
is much easier to identify later than a random filename.
How to Copy a Screenshot Without Saving It
Sometimes you do not need an image file at all.
Suppose a friend asks you to show them an error message. You can press Windows + Shift + S, select the error, and then paste the screenshot directly into your conversation.
You can also use Ctrl + C inside Snipping Tool to copy a captured snip to the clipboard. Then press Ctrl + V wherever you want to paste it. Microsoft’s Snipping Tool documentation lists Ctrl + C as a shortcut for copying the snip.
This is faster than saving the image, navigating to the folder, finding the file, and attaching it manually.
How to Take a Delayed Screenshot on Windows
A delayed screenshot is useful when you need to capture a menu, dropdown, notification, or another temporary element.
Open Snipping Tool and choose the Delay option. Microsoft currently documents delays of 1 to 5 seconds. Start the capture and use the countdown to prepare the screen. When the delay finishes, select the area you want to capture.
Imagine you need to capture a right-click menu. Normally, the menu disappears as soon as you click elsewhere. A delayed screenshot gives you enough time to open the menu and prepare the screen before the capture begins.
For software tutorials, this feature can save a lot of frustration.
How to Screenshot a Menu on Windows
Menus can be difficult to capture because they often disappear when you interact with the screenshot tool.
The Snipping Tool’s delay feature provides a practical solution. Set a short delay, start the capture, open the menu you want to show, and wait for the capture process.
You can then select the menu area and save the result.
This method is particularly useful when creating step-by-step instructions for software because menus are often the exact part of the interface readers need to see.
How to Take a Screenshot and Record Your Screen
Modern versions of Snipping Tool can also record a selected area of the screen.
Microsoft currently documents Windows + Shift + R as the shortcut for opening the Snipping Tool video-capture overlay. You can select a rectangular area, start recording, and stop when finished.
This is different from a traditional screenshot because it creates a video rather than a still image.
Screen recording is useful when a single screenshot cannot explain what is happening. For example, if you want to demonstrate a sequence of clicks, a menu interaction, or a software workflow, a short recording may be more useful than several individual screenshots.
Where Are Screenshots Saved on Windows?
The location depends on how you captured the screenshot.
When you use Windows + PrtScn, Windows saves the screenshot in the Pictures > Screenshots folder.
When you use Windows + Shift + S, the capture is copied to the clipboard and made available through the Snipping Tool interface. You can save it manually to your preferred folder.
If you used PrtScn alone, check the clipboard by opening Paint and pressing Ctrl + V.
Knowing this difference can prevent a lot of confusion. A screenshot can exist temporarily in your clipboard without appearing as a file in File Explorer.
Why Is My Screenshot Shortcut Not Working?
If your screenshot shortcut does not appear to work, start by checking which shortcut you are using.
Try Windows + Shift + S first. If the Snipping Tool overlay appears, the Windows screenshot system is working.
If you press PrtScn and see nothing happen, remember that the screenshot may have been copied to the clipboard rather than saved as a file. Open Paint and press Ctrl + V.
You can also open Snipping Tool directly from the Start menu and try capturing an image from there.
On some laptops, keyboard functions may require the Fn key, so check the keyboard layout and manufacturer documentation if the Print Screen function is combined with another key.
Best Windows Screenshot Shortcut for Different Situations
Choosing the right screenshot method becomes easy once you understand what each shortcut does.
| Situation | Best option |
| Capture a small section | Windows + Shift + S |
| Capture a full screen and save it | Windows + PrtScn |
| Capture only the current window | Alt + PrtScn |
| Quickly paste a screen image | PrtScn |
| Capture a menu | Snipping Tool + Delay |
| Edit and annotate a screenshot | Snipping Tool |
| Extract text from a screenshot | Snipping Tool Text Actions |
| Record part of your screen | Windows + Shift + R |
For most people, Windows + Shift + S is the best shortcut to learn first. It is flexible enough for everyday screenshots and avoids the need to install additional software.
Tips for Better Windows Screenshots
A technically correct screenshot is not always a useful screenshot. If you are taking images for a tutorial, article, presentation, or support request, a little preparation can make the result much clearer.
Before capturing, close unrelated windows and remove unnecessary information from the screen. If you are demonstrating a particular button or setting, position it clearly in the center of the area you intend to capture.
For instructional screenshots, annotations can also make a major difference. A simple arrow, circle, or highlight can tell the reader exactly where to look.
It is also a good idea to check screenshots for private information before sharing them. Browser tabs, email addresses, notifications, usernames, account information, and messages can accidentally appear in a full-screen capture.
Frequently Asked Questions About How to Screenshot on Windows
What is the easiest way to screenshot on Windows?
The easiest flexible method is Windows + Shift + S. It opens the Snipping Tool capture interface and lets you select the exact area, window, or screen you want to capture.
How do I screenshot part of my screen?
Press Windows + Shift + S, choose the rectangular or freeform capture option, and select the area with your mouse. The captured image is copied to the clipboard and can be edited or saved using Snipping Tool.
How do I screenshot the entire screen?
Press Windows + PrtScn to capture the entire screen and save it as an image file. The screenshot is normally stored in Pictures > Screenshots.
How do I screenshot only one window?
Click the window you want to capture and press Alt + PrtScn. The image is copied to the clipboard, so you can paste it into another application with Ctrl + V.
Where is the screenshot folder in Windows?
For screenshots created with Windows + PrtScn, open File Explorer and go to Pictures > Screenshots.
Can I screenshot without a Print Screen key?
Yes. Windows + Shift + S is the easiest alternative. Microsoft also documents Fn + Windows + Space Bar for some devices that do not have a dedicated PrtScn button.
Can I screenshot a dropdown menu?
Yes. Use the Snipping Tool’s delay option. Set a delay, start the capture, open the dropdown menu, and then select the area you want to capture.
Can I edit a Windows screenshot?
Yes. Snipping Tool provides tools for cropping, drawing, highlighting, adding shapes, and other edits. Current versions can also provide text actions for extracting text from a screenshot.
Can Windows record the screen?
Yes. Current Snipping Tool versions can record a selected rectangular area of the screen. The shortcut Windows + Shift + R opens the screen-recording interface.
Conclusion
Knowing how to screenshot on Windows can save time whether you are working, studying, troubleshooting, creating content, or simply trying to save something interesting from your screen. Windows 10 and Windows 11 provide several built-in methods, so you do not need complicated third-party software for most screenshot tasks.
If you only remember one shortcut, make it Windows + Shift + S. It gives you the flexibility to capture a specific section, window, or entire display and then edit or save the result. For automatically saving a full-screen image, use Windows + PrtScn, while Alt + PrtScn is useful when you only need the active window.
Once these shortcuts become familiar, screenshots stop being a frustrating technical task and become a quick part of your everyday Windows workflow.